Wednesday, April 27, 2011

DIY an Origami Mobile

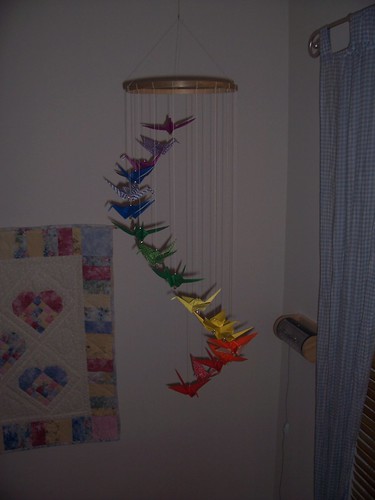
I feel bad that I dropped the blog ball and didn't see the comments from the previous crafty posts. Since I didn't see any instructions on the web for a circular origami mobile, I thought I should make up for my slackerness by doing a tutorial/how-to so that you can make one of these nifty mobiles for your home too. This is my first how-to/tutorial so I'd love any feedback or suggestions!

Origami Mobile

Materials:
Origami Paper in a variety of prints and patterns
Beads
Heavy Thread (such as embroidery floss)
Large Needle (such as an embroidery needle)
12" embroidery hoop with the outer hoop removed
Hook
Elmers Glue
Scissors

1.  Fold eighteen (18) origami cranes. There's lot of information on this on the web so I'll skip repeating those instructions here.

2.  Cut the following lengths of thread:  12", 13", 14", 15", 16", 17", 18", 19", 20", 21", 22", 23", 24", 25", 26", 27", 28", and 29".  You should have 18 pieces of thread when you're done.

3.  Tie a knot at the end of the 12" piece of thread.  The knot should be large enough to hold your bead on the thread.  

4.  With the other end of the thread, thread your needle.  Add a bead to your thread and run the needle and thread through the bottom of one crane.  This will be the first crane and shortest crane on the mobile.

5.  Add another bead to the needle and thread.  You should now have a bead under the crane and on top of the crane.  The bead is important because the cranes are made of paper and the hole that the thread runs through can grow slightly in size during the construction process.  We don't want the crane to fall off the thread!

6.  Remove the needle and tie the free end of the thread to the hoop.  Trim any excess thread on either end.   

7.  Repeat steps 3 through 6 for all the pieces of thread - continuing in order from shortest to longest.  Evenly space the cranes around the hoop so that they gradually descend.

8.  Once you've tied all the cranes to the hoop, add a dot of glue where the thread is tied to hoop.  This will keep the thread positions in place.  Let the glue dry before proceeding.

9. Cut 3 more  pieces of thread - each 24" long.   Tie the 3 pieces of thread equally spaced around the hoop.

10.  Gather the three hanging ends of the thread and tie them together in a knot about half way along the length of the thread.  

11.  Tie another knot at the end of the remaining length of the 3 gathered pieces.

12.  Install the hook from the ceiling and hang your mobile!

Because origami is so light, the crane mobile with gentle twirl - an added bonus!

I hope these instructions are easy to follow.  If you have any questions, post them in the comments and I'll answer them or update the post to clarify.  Also, let me know if you think video instructions would be easier to follow.  I've made a few of these, so it seems easy to me - I'd like a newbie perspective.  Thanks!

Tuesday, April 26, 2011

Spackling - my new favorite hobby

I don't know what my problem is.  I had it in my head that spackling is only for the pros.  That I should hire a handyman to do these tiny little jobs.  I was wrong big time.  Spackling is so easy!   In fact, I love spacking - it's my new favorite hobby :-)  Part of the reason I thought spacking was hard is because we have several of these ugly little spots around the house (this one from the kids' bathroom).

Spackle Blemish

I don't mean to knock Glenn's efforts since he definitely gave it the old college try.  Part of the reason his spackle jobs are a little homely I think, is because spackling requires patience and we're usually running around with a million things to do and not enough time in the day.  Just for fun, here's a close up of the spot in black and white - it's looks very arty?

Ugly Spot

Since we wanted to paint the kids' bathroom, I needed to take care of this blemish first.  I got some fresh spackle at Lowe's and a new sanding sponge.  

DSC_0695

I wasn't paying much attention when I bought the spackle, so when I opened the jar up, I was surprised with pepto bismol pink colored putty.  It dries white so you know when your patch work is ready for sanding and painting - very clever!

DSC_0702

Here's spackle trick from Glenn:  a credit card (or in my case an old unloaded gift card) works just as well as a putty knife for applying spackle (they're also easier to find around the house :-).

DSC_0699

Apply spackle, dry, sand and you're ready to paint.

DSC_0701

Glenn and I have a new deal now:  I take care of the spackling and he vacuums all the dust!  That's a great deal for us since I hate to clean up and Glenn is Felix from the odd couple.  Come to think of it I'm a little like Oscar.  We make a great team :-)

Monday, April 25, 2011

Purple Rain (or how I painted the kids' bathroom)

Since the weather hasn't been cooperating, we've been focusing in indoor projects.  I decided to spend our kid free Friday night painting the kids' bathroom (I'm easily entertained). 

The bathroom is pretty standard - tub, toilet, vanity, and mirror and it's sorely in need of a paint job.  After several years, the walls are scuffed and it's looking a little dingy.  Although I think the fake vampire teeth are a nice decorating touch.

Vampire Teeth copy

I'm especially excited to try out our new paintbrush.  I don't have a picture of the new (aka clean) brush but here's the wrapper in case anyone is curious about which brush we used.  That's our furry toilet cover in the background.  It works pretty well for a photo back drop, doesn't it?

P4230116

I've never in my life spent $14 on a paint brush and honestly I was a little shocked at the price at Duron.  Lowe's also sells the same brush at about the same price.  Turns out the brush is worth it though.  It made all the edging and detail work easier and the lines came out clean.  Since the most labor intensive part of painting is the edging and painting a bathroom is primarily an edging job, $14 seems worth it.

DSC_0738

We decided on a light purple color called Rhapsody Lilac to match the shower curtain.  Seems like paint always looks darker on the wall than on the small swatch but we were very happy with the finished product.  The color complemented both the shower curtain and the print from Etsy nicely! 

P4230142

P4230143

My other favorite part of painting was watching Six Feet Under on DVD.  I'm happiest when multitasking and since the bathroom is small, I was able to leave the laptop on the floor as I worked my way around the bathroom.  My next project?  The powder room in Palm Breeze and Eat Pray Love with Julia Roberts (total chick flick that Glenn would never watch)!

Friday, April 22, 2011

The Best Laid Plans

This week is spring break for the kiddos and they're off at Disney with the grandparents so it's a spring break for us too.  We planned a week of sleeping through the night, sleeping in on weekends and spending our nights and weekends getting to all those things we don't normally have time to do such as sanding and painting the front door trim which is sorely in need of it.

The paint is peeling and we have these funky black spots all around the trim.  The manager at our local Duron paint store said that these spots are from the trees around the doorway.  We have to sand them all off, prime, and paint.  We left Duron armed with all the necessary supplies to tackle this project.  Since we were at Duron, we even bought the paintbrush Sherry at YHL recommended.  They actually didn't have the exact model brush (it was sold out), but the manager assured us that this is the same brush but nicer.  It also wasn't $5 (more like $14!).  I hope it's as good as it's supposed to be.

Mother Nature seems to have a different plan for us:

Weather

We're having a week of rain!  The only day it's not supposed to rain, we both have plans for that evening.  All this rain is great for the flowers but not so great for our plans to paint the house exterior. 

We really want to get the door painted before it gets too hot.  Washington summers can be miserably hot.  There might be a small window Sunday morning that we can try to squeeze in this project.  I'm crossing my fingers :-)

Thursday, April 21, 2011

It started with a floor plan...

I'm not sure what actually motivated us to finally finish our basement after living in the house for seven years.  I think what pushed us over the edge was the kids toys.  They are *everywhere* - in every corner of the house.  We don't even buy them - we've just accumulated them from various holidays and birthdays.  Whenever we try to donate or give away something, the targeted items becomes a "favorite" that cannot be parted with.  I suppose finishing the basement is our way of making the house more for the adults again. 

Once we mentally committed to this sizable project - we needed to dig up the builder's original floor plans for reference.  Since we bought the house so long ago, I couldn't for the life of me find the plans.  The county doesn't keep plans this old on file but luckily, a quick request to our neighborhood Yahoo group solved the problem and within a couple days we had a copy of the basement floor plans as envisioned by Pulte Homes, our builder.

Builder Floor Plan

We decided on a couple modifications to accommodate our specific needs, such as making the study a lot larger since I work from home once a week.  Plus I'm pretty messy so the extra space will give me plenty of room to spread out my mess :-)  We also have the addition at the back of the house but this being America, ours is supersized and called a Florida Room.  This ends up being Glenn's space for exercise equipment and most importantly a big TV.

I was able to whip together our version of the floor plan using Microsoft Visio really easily.

Mock Up

Since we're not yet done with this project, we're still modifying and tweaking it.  Friends and family and anyone reading this blog - please feel free to comment and make suggestions (especially while you still can since the basement isn't done yet :-).

Wednesday, April 20, 2011

Front Yard Fresh Up

Glenn is a little obsessed with the lawn.  Religiously he weeds, seeds, and fertilizes on a prescribed schedule that our local hardware store recommended to him.  But the bushes tend to get neglected since I've never paid much attention to them and Glenn's more focused on getting our lawn to look like a green carpet.

Our house came pre-landscaped and like many lessons learned, we should have paid more attention to the spacing and placement of the newly planted landscape but of course we didn't.  They've had seven years to fully take root and spread and one plant looks like a creature coming out from the black lagoon with arms and legs.

before trim

Glenn planned a full day of trimming the bushes, mulching, and seeding the lawn - the key word here is planned.  He got about half way done with trimming with the electric hedge trimmer and then cut himself pretty darn deep.  Luckily his digits were still attached but he was forced to take a break from yard work and go to the emergency room. 

However, being as obsessed about the yard that he is, Glenn didn't let a near dismemberment stop him.  He finished up the trimming and mulching when he got back from the ER.

Here's his finished product. 

after trim

The front yard looks so much better!  And more importantly - the Scary Swamp Thing doesn't look so scary anymore - sounds like a line from a kids story!

Friends:  Any thoughts, or ideas?  Please don't by shy and feel free to leave comments!

Tuesday, April 19, 2011

Container Gardening

I'm a horrible procrastinator.  We bought two of these large planters last year but never got around to actually putting anything into them.  This year we made some progress and actually filled the planters with gravel and top soil.  They've been sitting in this state for the past two weeks.

Half Finished

Rather than wait another year to actually put plants in the planters, blogging about our home improvement projects has really motivated us to finish these half completed projects.  Combined with a great sale on petunias at Lowe's ($0.50 for a six pack), we had the motivation to finish this simple project :-)

Lowes Bargain

The only drawback was that the plants didn't have many flowers blooming but were otherwise healthy and at $0.50 a pack, we weren't going to be too picky.  On our way out we also saw the sign that Lowe's guarantees their plants for a year and since they're annuals, that's pretty much a lifetime warranty!

After an afternoon of playing with the dirt and flowers (with a short interruption when we thought Glenn cut his finger off with the hedge trimmer), we had these two pretty planters to adorn our front door.  Hopefully with some sunshine and a little water we'll see more magenta in the coming weeks.  If not, we're digging them back up and returning them to Lowe's ;-)

Completed Container

Front Door